Long exposure sparkler photographs and sparkler exits
Are sparkler exits and long exposure photographs during your weddings on your mind? Whether it is drawing words in the air or creating swirls around the couple you’re working with, they were on mine for a long time. I went out alone and tried doing them around bushes or small trees to get practice. This was so that I wasn’t experimenting on the wedding day. I try my best to make the time during these shots efficient and worthwhile. Nailing these photographs each time will make your photography stand out, you feel better, and you will have your clients wowing at your images. I hope that some of the information you find here helps you achieve better photos when doing the longer exposure photographs. Please leave me any questions or feedback below in the comments. This will be a great opportunity to capture beautiful photos, especially when your couple has done lots of Pinterest-ing and thinks this will be the perfect end to their night. You’ll be sure to wow them! I will explore everything you need; safety, post processing and so much more. Most of the images I will show are near SOOC with minor adjustments to straightening and white balance. This way you can see images near to what they were photographed at.
What you’ll need:
- Camera
- Tripod (for long exposures)
- LED or flash with stand (optional)
- Lighter or candle
- Sparklers
- Cell Phone
- Lots of Energy!
Most of today’s cameras have the ability to do beautiful long exposures without much noise, so you may be able to unlock a new world with what you already have in your bag. Whenever I prep for a wedding, regardless of the couple’s plans or knowing all of the details, I always pack my Mefoto Day Trip tripod. It comes in an assortment of color options and works perfect for what I need. You never know when you’re going to need it;99% of the time, I always end up using it. When I don’t use the Mefoto, it is small enough to carry and fit on the side of my bag where I don’t even know it’s there. Since I photograph with Nikon D4s, they do carry a bit of weight, then add the Nikkor 14-24mm 2.8 on the body and that ends up being about 5 pounds. It is the smallest tripod I have found that works with my setup. If you need something even more compact this works great. Platypod. A very flat plate that allows you to put a tripod head on and use low to the ground. Either way these two tools will be very helpful to stabilizing your camera. The LED I use is very basic, but has a nice feature of temperature adjustment, all for around $25.00! Any cell phone with a camera light will work for focus assisting. Sparklers are usually provided by the couple, venue, or planner. However you can find them locally at most stores in your area. A good sized 30″ is going to give you the most time burning. Having an assistant on hand is wonderful too for starting and stopping the camera, helping with focus and general help. You’ll be running around just shortly so make sure you have lots of energy! 🙂

| CAMERA | Nikon NIKON D4 |
| LENS | AF-S Zoom-Nikkor 14-24mm f/2.8G ED |
| ISO | 2500 |
| FOCAL LENGTH | 16.0 mm (16.0 mm in 35mm) |
| APERTURE | f/2.8 |
| EXPOSURE TIME | 0.02s (1/50) |
| NAME | DSC_4907.jpg |
| SIZE | 4928 x 3280 |
| FILE SIZE | 15.43 MB |
| DATE TAKEN | 2014-11-10 21:33:42 |
| DATE MODIFIED | 2015-02-11 14:53:21 |
Challenges:
- Location
- Lighting
- Timing
- Settings
- Focusing / Movements / Your couple’s cooperation
- Safety
There can be a lot of challenges when photographing sparkler exits or long exposure photographs. Learning this all on my own I had to overcome a lot of challenges that I was not aware of. Having your settings familiar in your head will allow you to efficiently get through these photos successfully. Finding a great location will be easy but pay attention to the surroundings and where you are placing your couple. The ambient lighting around you is important so that you do not overexpose your scene or a part of it. The biggest light distractions can be car headlights, streetlights, and light coming through trees from porch lights. All of these external lights will have a very strong affect on your images while photographing a long exposure to capture sparkler trails or sparkler exits. Avoid these areas as you may get an undesired hotspot in your photo. With sparkler exits and low lighting, the movement of the couple running down the center line of people will make focusing difficult. Don’t be afraid to take control of a staged shot during these times, the couple will love it! Other than that be yourself – Be amazing!
As we progress through the night of the wedding you’ll start to think to yourself that you want to go out and photograph something special for the couple you’re working with. Get the timing right is key for any wedding. You do not want to pull the couple away too long from their reception, or too short so that you can’t complete the photography you are trying to make. Scouting the location ahead of time will do you wonders when you’re looking for lighting conditions and distracting lights that might be shining into your scene. Before you bring your couple out after scouting a location don’t forget everything you’ll need, including that lighter if you’re going to do some long exposure sparkler photos.

| CAMERA | Nikon NIKON D4 |
| LENS | AF-S Zoom-Nikkor 14-24mm f/2.8G ED |
| ISO | 640 |
| FOCAL LENGTH | 14.0 mm (14.0 mm in 35mm) |
| APERTURE | f/6.3 |
| EXPOSURE TIME | 4s (4) |
| NAME | DSC_0361.jpg |
| SIZE | 4808 x 3240 |
| FILE SIZE | 7.25 MB |
| DATE TAKEN | 2016-11-04 20:44:16 |

| CAMERA | Nikon NIKON D4 |
| LENS | AF-S Nikkor 50mm f/1.4G |
| ISO | 4000 |
| FOCAL LENGTH | 50.0 mm (50.0 mm in 35mm) |
| APERTURE | f/1.4 |
| EXPOSURE TIME | 0.00625s (1/160) |
| NAME | Kim + Adam’s Wedding-769.jpg |
| SIZE | 4366 x 2906 |
| FILE SIZE | 8.33 MB |
| DATE TAKEN | 2015-10-02 20:17:37 |
Finding a location:
First, find a location. Some light is good, not too much but not too little. Scout the area between some dancing. When looking for a spot make sure the ground is not wet or shifting. This is a very minimal impact but being in grass can affect your shot. Shifting of the camera and tripod, due to spongy grass, will slightly blur your image and have you wondering why. Try avoiding wood chips or mulch, these will shift your camera easier than grass. A simple firm push down on your tripod will stabilize your setup to make for a clearer photograph.
Lighting:
Flash, no Flash, or LED. Off camera lighting, like an LED panel, is going to offer you the softest light. A flash will give you a sharper light, unless you are using diffusers, or soft-boxes. I think that just complicates things, but it does make for prettier lighting. I currently use this LED panel. It screws on a standard light stand, simple enough. The best feature about this light, for the price, is it allows for temperature adjustment. Another choice for more control is this $64.00 Led panel that has digital controls by Bestlight. This one requires battery packs. Either way you can control brightness and use it to assist focusing. You can always combine flash and LED lighting or multiple LED lights to accent trees or other structures.
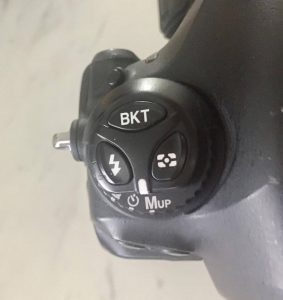
You can use Mup to delay the shutter raising
to when the sensor activates.(requires two presses)
If your camera does not have this in the menu you
may find “exposure delay mode.” This will
automatically delay the shutter to sensor transition.

| CAMERA | Nikon NIKON D4 |
| LENS | AF-S Zoom-Nikkor 14-24mm f/2.8G ED |
| ISO | 8000 |
| FOCAL LENGTH | 14.0 mm (14.0 mm in 35mm) |
| APERTURE | f/2.8 |
| EXPOSURE TIME | 2 seconds (2) |
| NAME | AnnaKateAaron.jpg |
| SIZE | 2048 x 936 |
| FILE SIZE | 2.02 MB |
| DATE TAKEN | 2016-04-23 20:50:12 |
| DATE MODIFIED | 2016-11-08 12:36:38 |
Timing:
How long the exposure of a photograph depends on how much movement or action you’ll have in your photo. Most of my sparkler trail photos last about 4 seconds. Some of the longer, more intricate and if the couple hasn’t been drinking has been 6-8 seconds. In these I will sometimes do a composite since I know it will be hard to keep them still. For example, for this shot, I will be 2 second at 4000 iso f-2.8, or lowest, then for the action I will go to iso 1200 8 seconds f(3.5) or so. All of the settings are dependent on the ambient light and the light I am introducing. Don’t forget about time away from the party as well. This can be a party killer so don’t take up too much of the couples time from the party, guests will leave. After the event is done is the prime time for this kind of shot. It has been a long night so be patient with your couple!
Camera Settings and setup:
I like to have my camera low, looking up capturing the occasional star or two. That’s why the tripod I use is so perfect for this, it’s only about 2 feet tall maxed out. When getting your camera ready to photograph these images, there is a few tricks to the camera that you may or may not know of. Manual up – Mup and Exposure delay mode. Most cameras today have a manual shutter up function. This allows the shutter to be moved out of the way and settle so you can then press the shutter button again to activate the sensor. The camera shutter causes shake when it is moving and that can translate into your photograph. This is good to use for shorter exposures so that your cameras’ internals aren’t disturbed while the shutter is capturing. Longer exposures allow for more exposure time so M-Up is good for those too for sure. Settings on your camera will vary. For the long exposure sparkler photos, you will need the ability to capture lots of light for a long period of time. Most of my long exposures start out at 3200 ISO, 4 seconds and aperture at 2.8. Whereas the sparkler exits vary a bit different with ISO in the Highest of settings due to the couples speed coming. The max usable (for me) is around 6400 ISO. Sometimes I have gone higher.
From there I will make minor adjustments to the ISO and leave the shutter speed the same since I will need a certain amount of time to perform the spinning of the sparkler or running around them. However it is a good starting point for you to begin at night. Each of the photos I post along with this blog have all of the settings so you can see the scene with the ambient lighting and added light so you can learn about how that was done and what settings I used. I always photograph in Raw and in Manual mode. With these photographs you’ll leave the white balance to auto if you are photographing in RAW.
White Balance:
Leave it to AUTO WB. With 2016 being no different than the last few years, LED lighting is becoming more popular, and color temperatures will fluctuate throughout your scene due to replacement bulbs. Shoot in RAW, AUTO white balance, and correct your color temperature in Lightroom. Or you can Photoshop it later. See: White balance Tutorial You can correct any color temperatures in post.
Focusing:
This was usually my difficult part until I discovered the phone for the long exposure. Two tricks work well. Most everyone has one on them and either using the screen to illuminate one of the couple’s face is just enough light to let the camera pick up contrasty contours of the face or white shirt against dark jacket. Your subject can grab their phone and help you get focused, otherwise if you have an assistant they can use their flashlight to light up. An LED Video Light on hand will be your best assisting with focus unless you have an on camera flash. The AF assists on those are usually pretty good. Just don’t forget to turn the flash off after focusing Using the live view is a really good way to get focus in these conditions as you can zoom in on most cameras pressing the magnifier button while in live view. If you’re using an LED light, in most dark conditions you only need about 1/4 power so you don’t blind the couple.
Cameras focus easier right in the center of the viewfinder, so when doing exits and faster moving subjects with sparkler exits keep the focus in the center or left center and you’ll generally lock on focus faster. If you have a videographer on the wedding they will be your next best friend for sparkler exits as most of them bring external lighting. As soon as she or he sets up and they begin to light the sparklers do a few test shots. If you do really get stumped focusing try to manual focus with your subject holding the phone near his or her face and manual focus through the viewfinder or live view.

Cameras focus faster in the center
of the viewfinder. Keep your focus
within the circle. The camera can
detect better contrast in this area.
Safety:
I had to leave this for the last part. Safety is always my concern. It may be my own, the couples or damage to property. The last thing I want to do is say sorry for something as it then is required for compensating somehow. Sparklers are a sure way for you to have mishaps. Make sure you stay far enough away from buildings, dry objects and your couples clothing and body.
Thankfully I only have had one mishap while practicing. In the photo below we photographed near our cars and I got embers from steel wool on the vehicle. The wifey wasn’t happy so I spent all day with a clay bar getting the sticky pieces of steel off the paint. This is another reason why I do not recommend doing this with steel wool and spinning it if you are around people or wooden structures. The embers from the burning last longer than sparklers (see photo below).
Avoid wet ground when you are running around so you do not slip. The couple will need to be really still during these and wet ground will also have them sinking in heels if the bride is wearing them.
Burning yourself or your couple is the worst that could happen next to burning the dress. Burns from sparklers leave a very bad burn, usually requiring medical treatment if you burn yourself severely enough.
Do not light more than 1 together as if you light multiples together the sparklers will hyper burn and cause a flare up of the heat, burning you.
Other than a few of the common sensical safety issues, go have fun and enjoy it! Below will be some of my tips to making beautiful images with sparklers.

| CAMERA | Nikon NIKON D4 |
| LENS | AF-S Zoom-Nikkor 14-24mm f/2.8G ED |
| ISO | 2000 |
| FOCAL LENGTH | 14.0 mm (14.0 mm in 35mm) |
| APERTURE | f/5.6 |
| EXPOSURE TIME | 10s (10) |
| NAME | IMG_3090.jpg |
| SIZE | 2048 x 1363 |
| FILE SIZE | 2.13 MB |
| DATE TAKEN | 2013-01-01 01:27:58 |
You’ll see in the photo to the left. The fire is greater, the sparks linger and I am wearing a heavy fire jacket, glasses and gloves. Do not use sparklers next to your couples.

| CAMERA | NIKON CORPORATION NIKON D4 |
| ISO | 250 |
| FOCAL LENGTH | 35mm (35mm in 35mm) |
| APERTURE | f/3.2 |
| NAME | _DSC3052-Edit.jpg |
| SIZE | 1600 x 1065 |
| FILE SIZE | 1.22 MB |
| DATE TAKEN | 2012-06-03 21:38:56 |
| Advanced | |
| EXPOSURE TIME | 3s (3/1) |
| FLASH | flash fired, compulsory flash mode, return light detected |
| METERING | pattern |
| EXPOSURE PROGRAM | manual |
PS – TIPS:
Faces: Stay off of the faces with your sparkler trail as it will ruin your shot. This will be learned through experience. I still cross over faces to this day, but make sure you realize when you do it and start the shot over as soon as you can.
Have plenty of sparklers: I usually go out with 5 sparklers, but if you’re new to “sparklering”, bring a few more because you’re going to need those to experiment. Windproof lighter is the best to light your sparklers but once your lit, touch the sparkler to the next one and it will light instantly. With sparkler exits, you will need way more than 5 sparklers. Make sure there have plenty on hand for the wedding guests to hold.
Light your new sparkler with a dying sparkler. This will save you a lot of time having to relight. Seconds matter when you’re taking the couple away from the party.
Writing letters in the air is easiest to write them facing the camera left to right. The camera will capture these reversed so you can then invert your image later in photoshop. If you’re up for the challenger then write them backwards 🙂
Stick your sparklers in the ground handle down so they are easier to find.
A windless lighter is the best, but a votive candle will make it easier to light.
Clean up your mess and the venue will love you!
I hope this helps you all out! Please let me know if there’s anything I can further answer. I will update the post periodically when I receive questions! Try this out and share your photos with me in the comments!
You can do this! Let’s GO!
Below are a few more photos that you can see the camera settings and lenses that I use. My favorite is the 14-24mm nikkor 2.8.

| CAMERA | NIKON CORPORATION NIKON D4 |
| ISO | 4000 |
| FOCAL LENGTH | 14mm (14mm in 35mm) |
| APERTURE | f/2.8 |
| NAME | DSC5897.jpg |
| SIZE | 4928 x 3280 |
| FILE SIZE | 18.18 MB |
| DATE TAKEN | 2013-01-12 20:08:28 |
| Advanced | |
| EXPOSURE TIME | 20s (20/1) |
| FLASH | flash did not fire |
| METERING | pattern |
| EXPOSURE PROGRAM | manual |
| EXPOSURE BIAS VALUE | 0 EV |
| EXPOSURE MODE | manual |
| LIGHT SOURCE | unknown |
| WHITE BALANCE | auto |

| Nikon NIKON D4 | |
| LENS | AF-S Zoom-Nikkor 14-24mm f/2.8G ED |
| ISO | 2500 |
| FOCAL LENGTH | 15.0 mm (15.0 mm in 35mm) |
| APERTURE | f/4.5 |
| EXPOSURE TIME | 6s (6) |
| NAME | DSC_7941.jpg |
| SIZE | 4928 x 3280 |
| FILE SIZE | 17.32 MB |
| DATE TAKEN | 2013-09-21 21:59:54 |
| DATE MODIFIED | 2013-09-26 16:06:02 |